

在软件开发过程中,一款封装完善简洁大气的全家桶框架,能大大提升开发人员的工作效率,同时还能降低代码的复杂程序,也便于后期方便维护。本文所涉及源代码在文章最后,有下载链接。
本文章所涉及封装的框架,可直接用于项目开发。
在集成软件开发框架时,我们需要考虑哪些要素:
1、用哪些技术
2、异常信息的处理
3、日志的打印,最好是能带参数打印sql日志(非问号形式的带参sql),本框架就是带参数打印sql,方便调试
4、接口返回数据格式的封装(瞧不起一些垃圾封装)
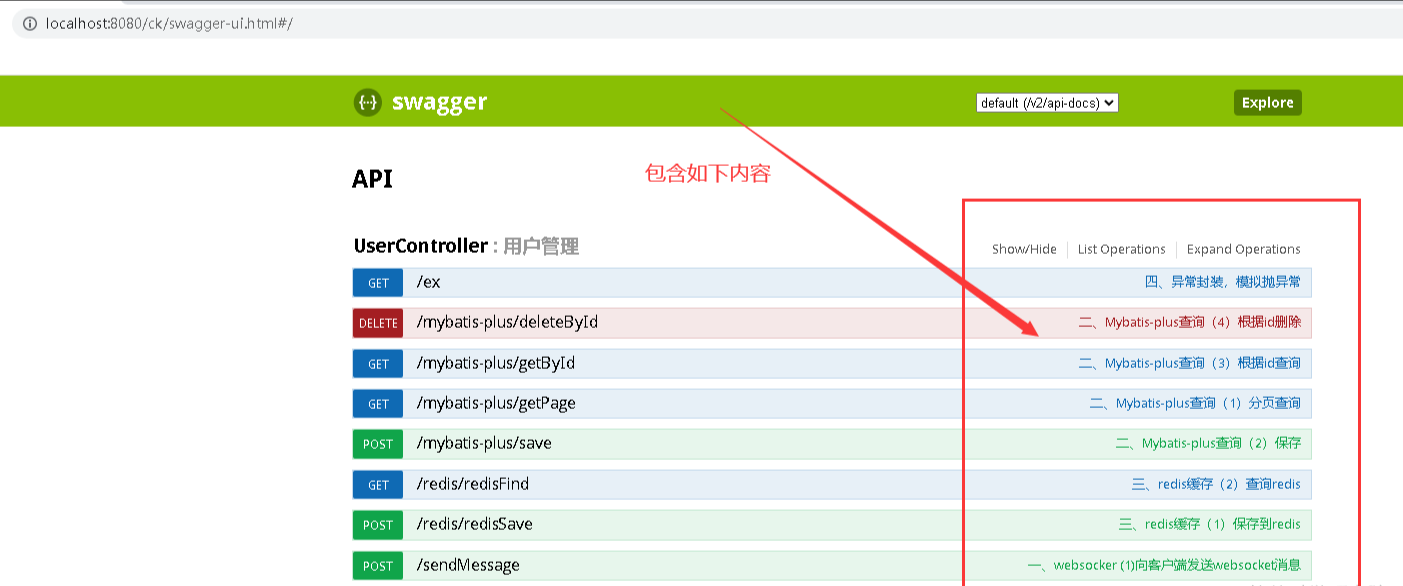
本博文主要分五大块讲解,分别为websocket的使用、mybatis-plus的使用、redis的使用、异常信息怎么使用、日志打印(重点是带参数打印sql语句,方便开发调式)
一、Websockt的集成
1、初始化配置
@Configuration
public class WebSocketConfig  {
    /**
     * 会自动注册使用了@ServerEndpoint注解声明的Websocket endpoint
     * 要注意,如果使用独立的servlet容器,
     * 而不是直接使用springboot的内置容器,
     * 就不要注入ServerEndpointExporter,因为它将由容器自己提供和管理。
     */
    @Bean
    public ServerEndpointExporter serverEndpointExporter() {
        return new ServerEndpointExporter();
    }
}
2、服务端收消息
@Slf4j
@Component
@ServerEndpoint(value = "/websocket")
public class WebsocketGet {

    /**
     * 连接事件,加入注解
     * @param session
     */
    @OnOpen
    public void onOpen(Session session) {
        String orderId = WebsocketSend.getParam(WebsocketSend.sessionKey, session);
        log.info("Websocket连接已打开,当前orderId为:"+orderId);
        // 添加到session的映射关系中
        WebsocketSend.addSession(orderId, session);
        //测试发送消息
        WebsocketSend.sendMessage(orderId, WsResultVo.success("恭喜,已建立连接"));
    }
    /**
     * 一、websocker (2)接收到客户端用户上传的消息
     * @param session
     */
    @OnMessage
    public void onMessage(Session session, String message) {
        log.info("收到Websocket消息:"+message);
    }
    /**
     * 连接事件,加入注解
     * 用户断开链接
     *
     * @param session
     */
    @OnClose
    public void onClose(Session session) {
        String orderId = WebsocketSend.getParam(WebsocketSend.sessionKey, session);
        // 删除映射关系
        WebsocketSend.removeSession(orderId);
    }

    /**
     * 处理用户活连接异常
     *
     * @param session
     * @param throwable
     */
    @OnError
    public void onError(Session session, Throwable throwable) {
        try {
            if (session.isOpen()) {
                session.close();
            }
        } catch (IOException e) {
            e.printStackTrace();
        }
        throwable.printStackTrace();
    }
}
3、向客户端发送消息
/**
* Websocket工具类
* 记录当前在线的链接对链接进行操作
*/
public class WebsocketSend {
/**
* 日志信息
*/
private static final Logger LOGGER = LoggerFactory.getLogger(WebsocketSend.class);
/**
* 记录当前在线的Session
*/
private static final Map<String, Session> ONLINE_SESSION = new ConcurrentHashMap<>();
public static final String sessionKey = "orderId";
/**
* 添加session
*
* @param userId
* @param session
*/
public static void addSession(String userId, Session session) {
// 此处只允许一个用户的session链接。一个用户的多个连接,我们视为无效。
ONLINE_SESSION.putIfAbsent(userId, session);
}
/**
* 关闭session
*
* @param userId
*/
public static void removeSession(String userId) {
ONLINE_SESSION.remove(userId);
}
/**
* 给单个用户推送消息
*
* @param session
* @param message
*/
public static void sendMessage(Session session, String message) {
if (session == null) {
return;
}
// 同步
RemoteEndpoint.Async async = session.getAsyncRemote();
async.sendText(message);
}
/**
* 向所有在线人发送消息
*
* @param message
*/
public static void sendMessageForAll(String message) {
//jdk8 新方法
ONLINE_SESSION.forEach((sessionId, session) -> {
if (session.isOpen()) {
sendMessage(session, message);
}
});
}
/**
* 根据用户ID发送消息
*
* @param result
*/
public static void sendMessage(String sessionId, WsResultVo result) {
sendMessage(sessionId, JSON.toJSONString(result));
}
/**
* 根据用户ID发送消息
*
* @param message
*/
public static void sendMessage(String sessionId, String message) {
Session session = ONLINE_SESSION.get(sessionId);
//判断是否存在该用户的session,判断是否还在线
if (session == null || !session.isOpen()) {
return;
}
sendMessage(session, message);
}
/**
* 根据ID获取Session
*
* @param sessionId
*/
public static Session getSession(String sessionId) {
Session session = ONLINE_SESSION.get(sessionId);
return session;
}
/**
* 根据传过来的key获取session中的参数
* @param key
* @param session
* @return
*/
public static String getParam(String key, Session session) {
Map map = session.getRequestParameterMap();
Object userId1 = map.get(key);
if (userId1 == null) {
return null;
}
String s = userId1.toString();
s = s.replaceAll("\\[", "").replaceAll("]", "");
if (!StringUtils.isEmpty(s)) {
return s;
}
return null;
}
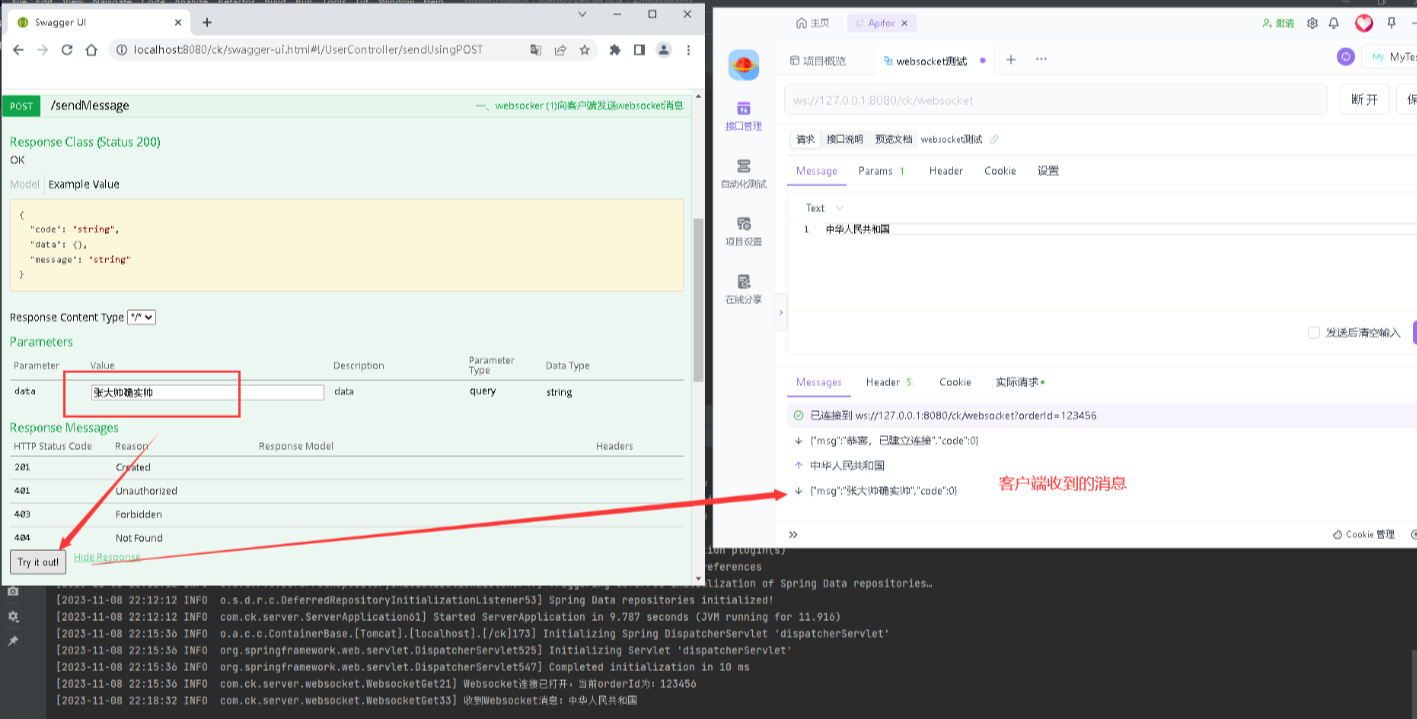
}4,websocket测试(客户端我们用apifox软件,自行百度下载
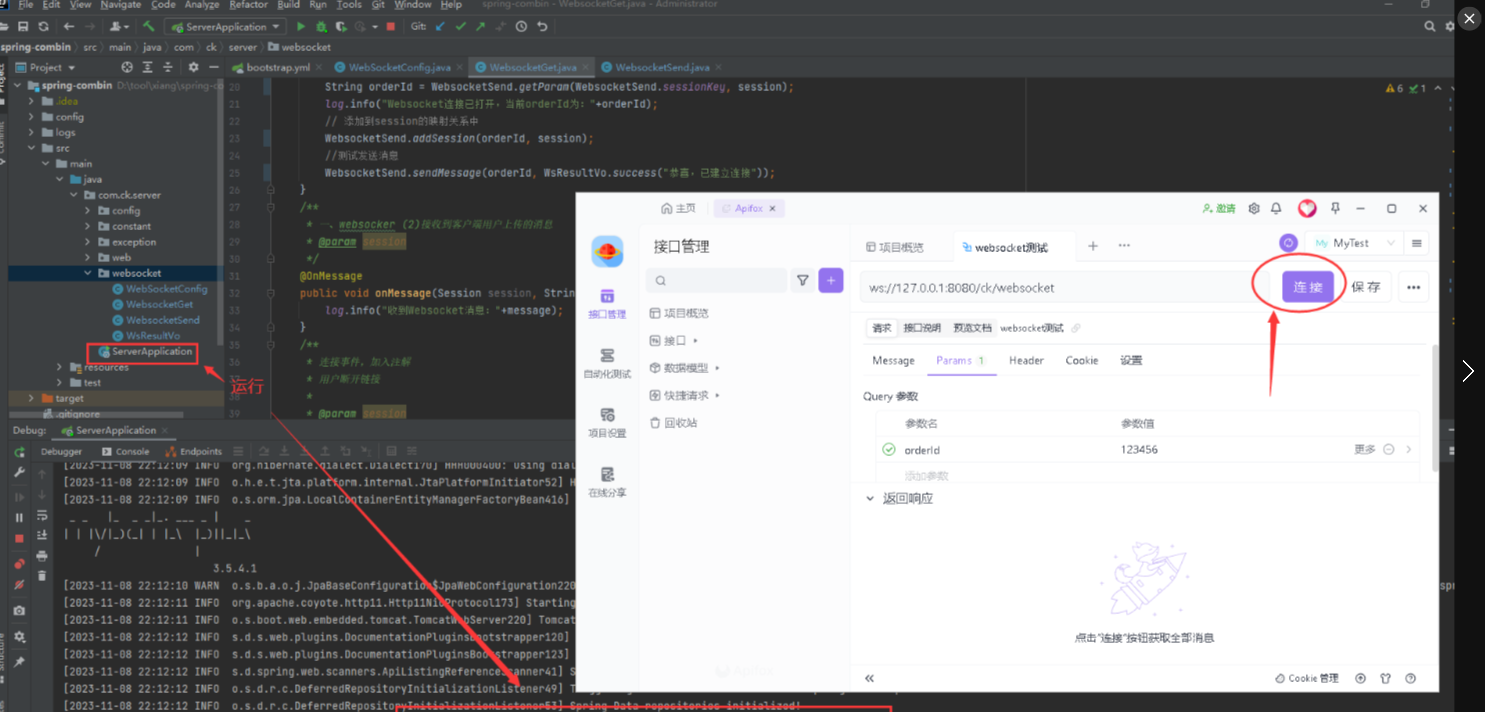
点击【连接】请求地址:ws://127.0.0.1:8080/ck/websocket?orderId=123456,注意参数orderId必填
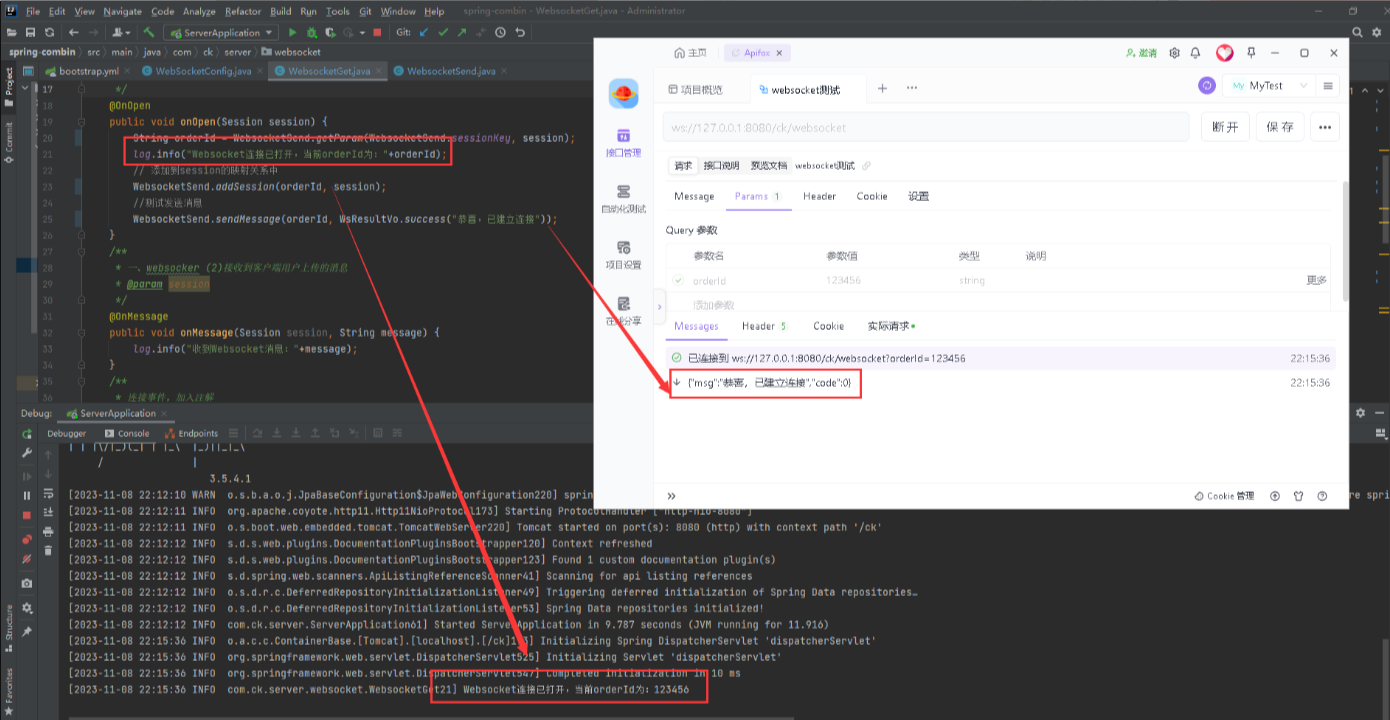
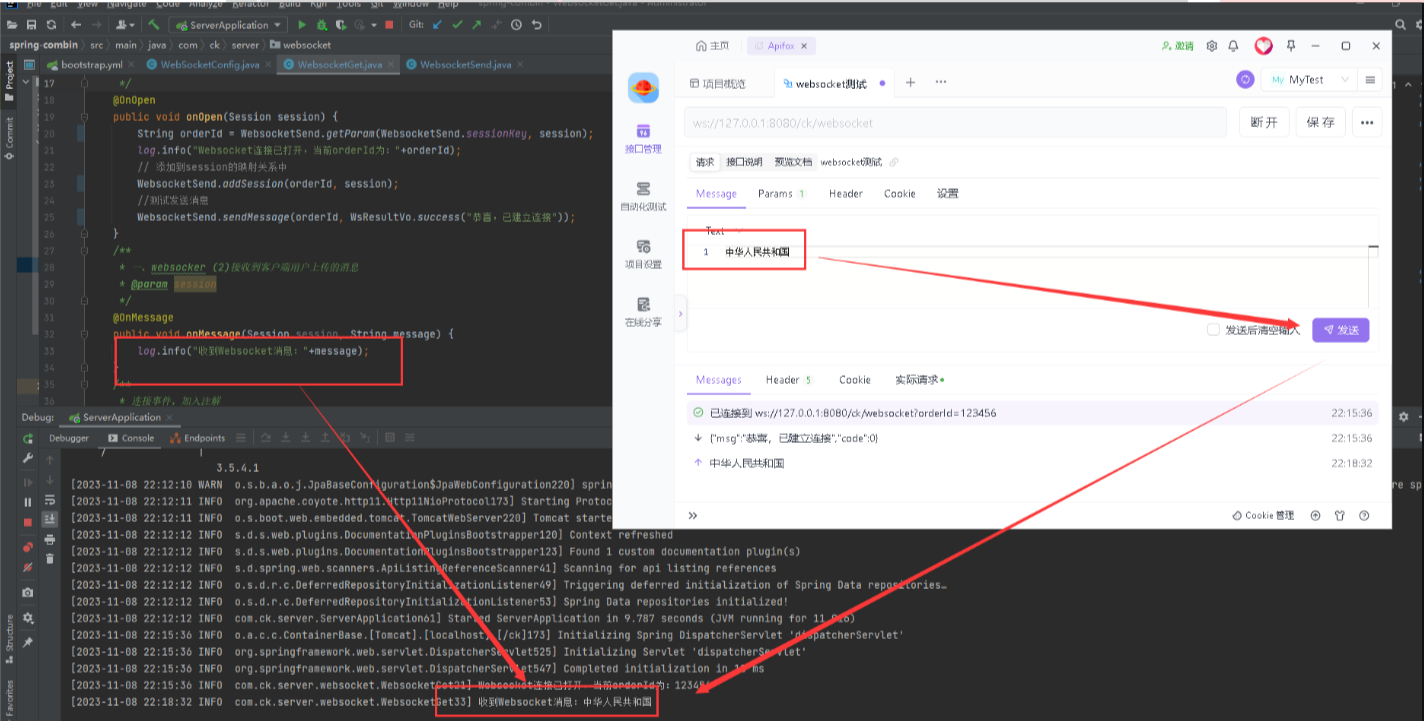
(1)客户端apifox向服务端发送消息
(2)服务器端向客户端发送消息,打开swagger地址:http://localhost:8080/ck/swagger-ui.html
通过swagger调用后端接口,后端收到接口请求,再向websocket客户端发送消息

二、Mybatis-plus的集成
1、初始化配置
@Configuration
@MapperScan("com.ck.server.web.mapper")
public class MybatisPlusConfig {
    /**
     * 添加分页插件
     */
    @Bean
    public MybatisPlusInterceptor mybatisPlusInterceptor() {
        MybatisPlusInterceptor interceptor = new MybatisPlusInterceptor();
        interceptor.addInnerInterceptor(new PaginationInnerInterceptor(DbType.MYSQL));//如果配置多个插件,切记分页最后添加
        //interceptor.addInnerInterceptor(new PaginationInnerInterceptor()); 如果有多数据源可以不配具体类型 否则都建议配上具体的DbType
        return interceptor;
    }
}
2、接口的使用
打开swagger地址:http://localhost:8080/ck/swagger-ui.html
3、mybatis-pluse的增、删、查、保存
@GetMapping("/mybatis-plus/getPage")
    @ApiOperation("二、Mybatis-plus查询(1)分页查询")
    public PageBeanVo<User> getPage(UserParam param) {
        PageBeanVo pageBeanVo = userService.getPage(param);
        return pageBeanVo;
    }

    @PostMapping("/mybatis-plus/save")
    @ApiOperation("二、Mybatis-plus查询(2)保存")
    public ResultInfoVo save(String name,Integer age,String email) {
        User user = new User();
        user.setName(name);
        user.setAge(age);
        user.setEmail(email);
        userService.save(user);
        return new ResultInfoVo();
    }

    @GetMapping("/mybatis-plus/getById")
    @ApiOperation("二、Mybatis-plus查询(3)根据id查询")
    public ResultInfoVo<User> getById(Integer id) {
        User user = userService.getById(id);
        return new ResultInfoVo(user);
    }

    @DeleteMapping("/mybatis-plus/deleteById")
    @ApiOperation("二、Mybatis-plus查询(4)根据id删除")
    public ResultInfoVo<User> deleteById(Integer id) {
         userService.deleteById(id);
        return new ResultInfoVo();
    }
service部分
@Service
public class UserService {
    @Autowired
    private UserMapper userMapper;
    /**
     * 根据id查询
     * @param id
     * @return
     */
    public User getById(Integer id){
        return userMapper.selectById(id);
    }
    /**
     * 分页查询
     * @param param
     * @return
     */
    public PageBeanVo<User> getPage(UserParam param){
        IPage<User> page = userMapper.getPage(param);
        System.out.println(page);
        return new PageBeanVo(page.getTotal(),page.getRecords());
    }
    /**
     * 保付
     * @param user
     */
    @Transactional
    public void save(User user){
        userMapper.insert(user);
    }
    /**
     * 保付
     * @param id
     */
    @Transactional
    public void deleteById(Integer id){
        userMapper.deleteById(id);
    }
}
mapper部分
public interface UserMapper extends BaseMapper<User> {
    /**
     * 分页查询
     * @param pageParam
     * @return
     */
    IPage<User> getPage(IPage pageParam);
}
mapper对应的xml的部分
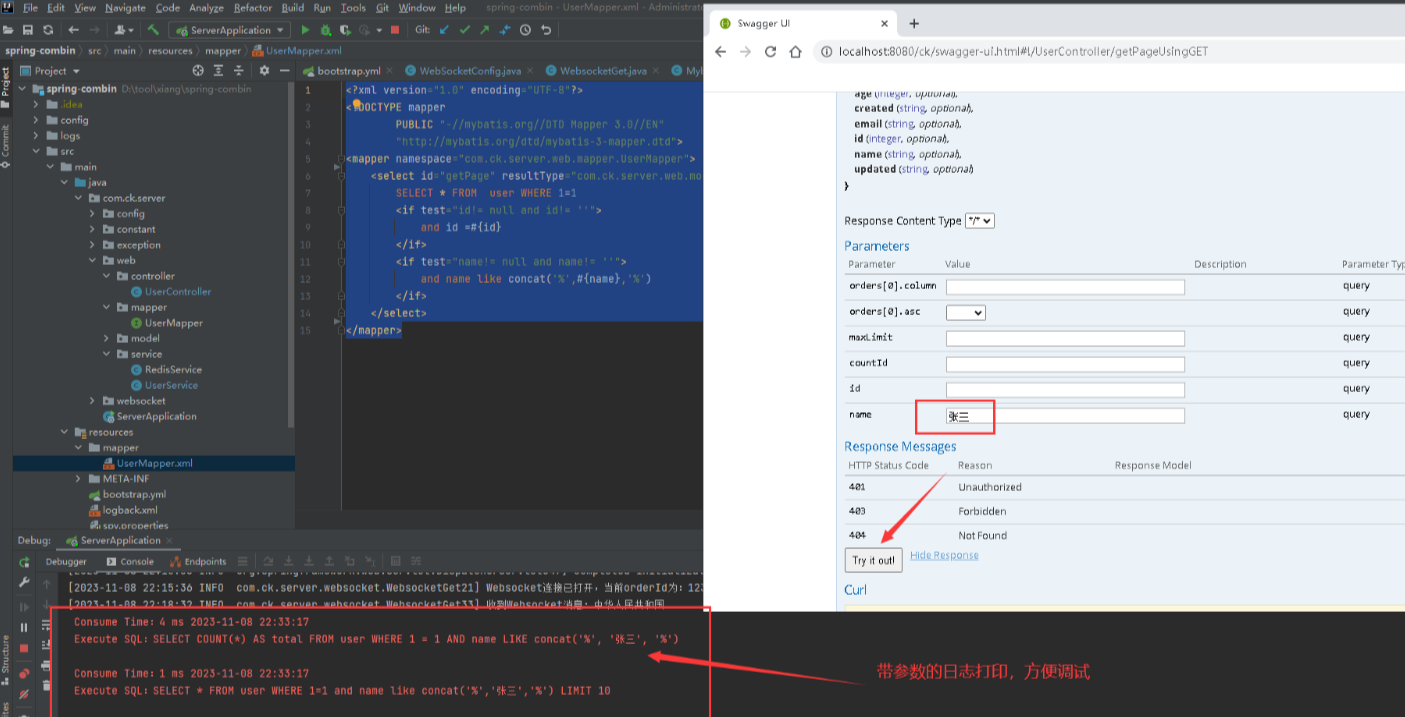
<?xml version="1.0" encoding="UTF-8"?>
<!DOCTYPE mapper
        PUBLIC "-//mybatis.org//DTD Mapper 3.0//EN"
        "http://mybatis.org/dtd/mybatis-3-mapper.dtd">
<mapper namespace="com.ck.server.web.mapper.UserMapper">
    <select id="getPage" resultType="com.ck.server.web.model.User">
        SELECT * FROM  user WHERE 1=1
        <if test="id!= null and id!= ''">
            and id =#{id}
        </if>
        <if test="name!= null and name!= ''">
            and name like concat('%',#{name},'%')
        </if>
    </select>
</mapper>
来个分页查询的截图:
三、redis集成
1、初始化配置
@Configuration
public class RedisConfig {
	@Bean
	public RedisTemplate<String, Serializable> redisTemplate(LettuceConnectionFactory connectionFactory) {
		RedisTemplate<String, Serializable> redisTemplate = new RedisTemplate<>();
//		redisTemplate.setKeySerializer(new StringRedisSerializer());
//		redisTemplate.setValueSerializer(new GenericJackson2JsonRedisSerializer());
		RedisSerializer stringSerializer = new StringRedisSerializer();
		Jackson2JsonRedisSerializer<Object> jackson2JsonRedisSerializer = new Jackson2JsonRedisSerializer<>(Object.class);
		ObjectMapper om = new ObjectMapper();
		om.setVisibility(PropertyAccessor.ALL, JsonAutoDetect.Visibility.ANY);
		om.enableDefaultTyping(ObjectMapper.DefaultTyping.NON_FINAL);
		jackson2JsonRedisSerializer.setObjectMapper(om);

		redisTemplate.setKeySerializer(stringSerializer);
		redisTemplate.setHashKeySerializer(stringSerializer);

		redisTemplate.setValueSerializer(jackson2JsonRedisSerializer);
		redisTemplate.setHashValueSerializer(jackson2JsonRedisSerializer);
		redisTemplate.setConnectionFactory(connectionFactory);
		return redisTemplate;
	}
}
2、redis的使用
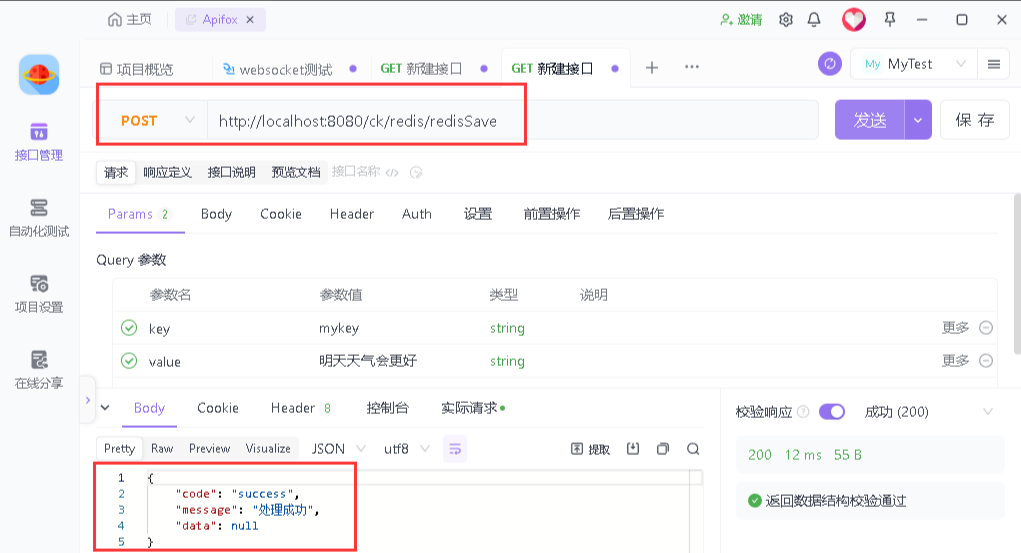
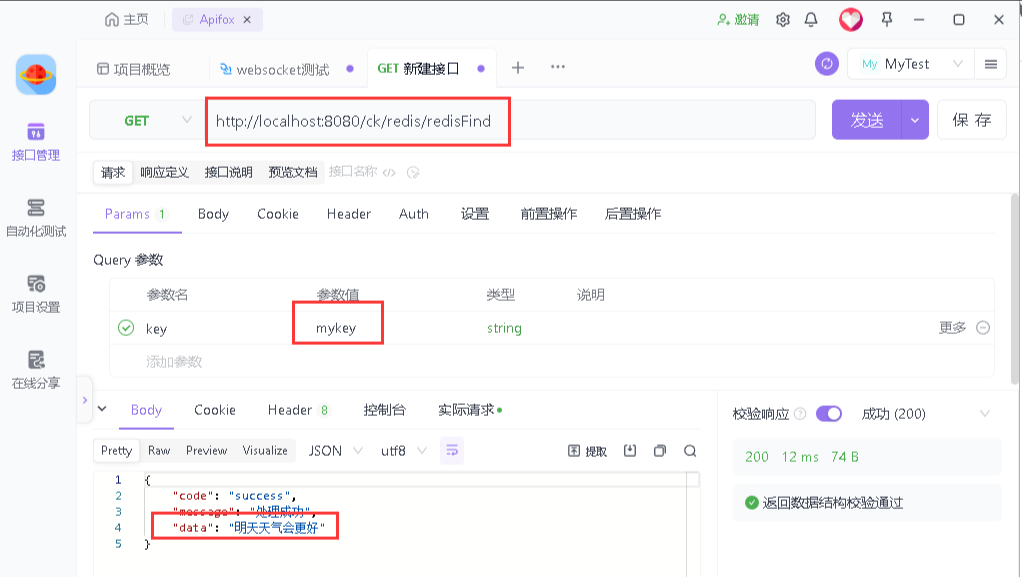
@PostMapping("/redis/redisSave")
    @ApiOperation("三、redis缓存(1)保存到redis")
    public ResultInfoVo<User> redisSave(String key,String value) {
        redisService.addString(key,value);
        return new ResultInfoVo();
    }

    @GetMapping("/redis/redisFind")
    @ApiOperation("三、redis缓存(2)查询redis")
    public ResultInfoVo<User> redisFind(String key) {
        String value = redisService.getString(key);
        return new ResultInfoVo(value);
    }
3、保存和查询截图
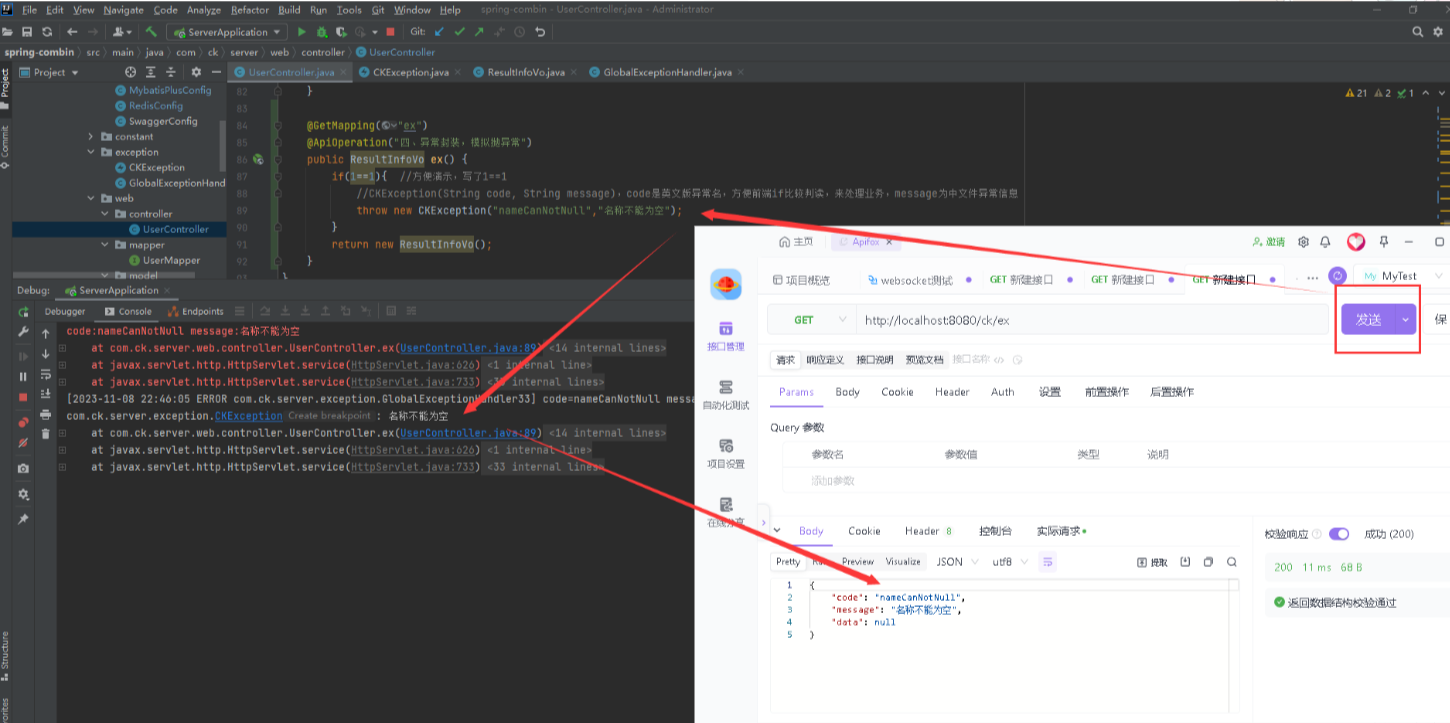
四、异常信息
异常信息结构和接口数据返回的数据结构是一致的
如接口返回的结构如下
1、封装对象
@ToString
@ApiModel()
public class ResultInfoVo<T> {

    public static final String SUCCESS="success";
    public static final String FAILED="failed";

    @ApiModelProperty(value = "业务code:成功为success,失败为其它业务,如roleIdIsNull")
    private String code="success";//业务code 成功为 success  失败为 其它业务编号,如paramIsNull
    @ApiModelProperty(value = "描述信息")
    private String message="处理成功";//描述信息
    @ApiModelProperty(value = "业务数据")
    public T data;//页数据


    public ResultInfoVo(){}

    public ResultInfoVo(T data) {
        this.data = data;
    }

    public ResultInfoVo(String message,T data) {
        this.message = message;
        this.data = data;
    }

    public ResultInfoVo(String code, String message) {
        this.code = code;
        this.message = message;
    }

    public ResultInfoVo( String code, String message, T data) {
        this.code = code;
        this.message = message;
        this.data = data;
    }
}
异常信息返回的对象
public class CKException extends RuntimeException {
    private Log logger = LogFactory.getLog(getClass());
    @ApiModelProperty(value = "业务code:成都为success,失败为其它业务,如roleIdIsNull")
    private String code;//业务错误码
    @ApiModelProperty(value = "描述信息")
    private String message;//错误详情
    @ApiModelProperty(value = "其它数据")
    private Object data;//其它数据


    public CKException(String code, String message) {
        this.code = code;
        this.message = message;
        this.data=data;
    }


    public CKException(String code, String message, Object data) {
        this.code = code;
        this.message = message;
        this.data=data;
    }
}
2、使用:
五、接口返回数据格式的封装
package com.ck.server.web.model.vo;

import io.swagger.annotations.ApiModel;
import io.swagger.annotations.ApiModelProperty;
import lombok.ToString;

/**
 * Created by Administrator on 2018/7/2.
 */
@ToString
@ApiModel()
public class ResultInfoVo<T> {

    public static final String SUCCESS="success";
    public static final String FAILED="failed";

    @ApiModelProperty(value = "业务code:成功为success,失败为其它业务,如roleIdIsNull")
    private String code="success";//业务code 成功为 success  失败为 其它业务编号,如paramIsNull
    @ApiModelProperty(value = "描述信息")
    private String message="处理成功";//描述信息
    @ApiModelProperty(value = "业务数据")
    public T data;//页数据


    public ResultInfoVo(){}

    public ResultInfoVo(T data) {
        this.data = data;
    }

    public ResultInfoVo(String message,T data) {
        this.message = message;
        this.data = data;
    }

    public ResultInfoVo(String code, String message) {
        this.code = code;
        this.message = message;
    }

    public ResultInfoVo( String code, String message, T data) {
        this.code = code;
        this.message = message;
        this.data = data;
    }

    public String getCode() {
        return code;
    }

    public void setCode(String code) {
        this.code = code;
    }

    public String getMessage() {
        return message;
    }

    public void setMessage(String message) {
        this.message = message;
    }

    public T getData() {
        return data;
    }

    public void setData(T data) {
        this.data = data;
    }
}
六、源代码下载:
链接:https://pan.baidu.com/s/16snuaL2X3oPelNm6uSMv4Q?pwd=dy7p
提取码:dy7p
专注JAVA系统优化、系统结构调整、系统问题排查医治、系统升级、架构设计、SQL语句优化、小程序、APP、企业应用软件开发,请 + hekf888,欢迎关注,时常发布技术分享博文